A few months ago I needed a simple tool that would gather certain app stats and integrate with our Rails apps easily. The underlying requirements were:
collect visits counter and/or response time of given part of app;
measure only certain (the most interesting) parts of app, e.g. concrete component or path, because the overall stats view is easily affordable with Google Analytics so additional toolset (collector, storage and visualization) sounds like an overhead.
Meet Stats Whisper
So I’ve created the Stats Whisper, a simple data gatherer for StatsD. StatsD, because of counters and timers data types, support for UDP packets and Graphite integration – we’re using it internally as data storage.
From Rails perspective, Stats Whisper is a middleware, which interacts with each request and gather data according to whisper_config.yml config file. Currently it can only provide a whitelist of which requests – or parts of app – have to be measured (time of execution in ms and counters for each route). The whitelist consists of regular expressions, e.g: ^/dashboard, matching only interesting requests. The message is being sent to StatsD (via UDP port) immediately once the request is completed.
It is essential to understand that the purpose of this library is to focus only on requests defined within whitelist. All the remaining are skipped, because it aims to measure only the most interesting parts of app, e.g. a concrete component – lets say user dashboard, product, a set of products or whatever is important to unleash the business value. Generally speaking, it’s up to the end user, what to measure and why.
The Stats Whisper library is not the only one on the market. I’m familiar with:
statsd-instrument, that can measure any app method execution time or count the amount of method invocation so it works even closer to the app than Stats Whisper;
scout_statsd_rack which measures execution time and count of requests of any app path – it’s not possible to specify only certain paths.
A word about stats gathering
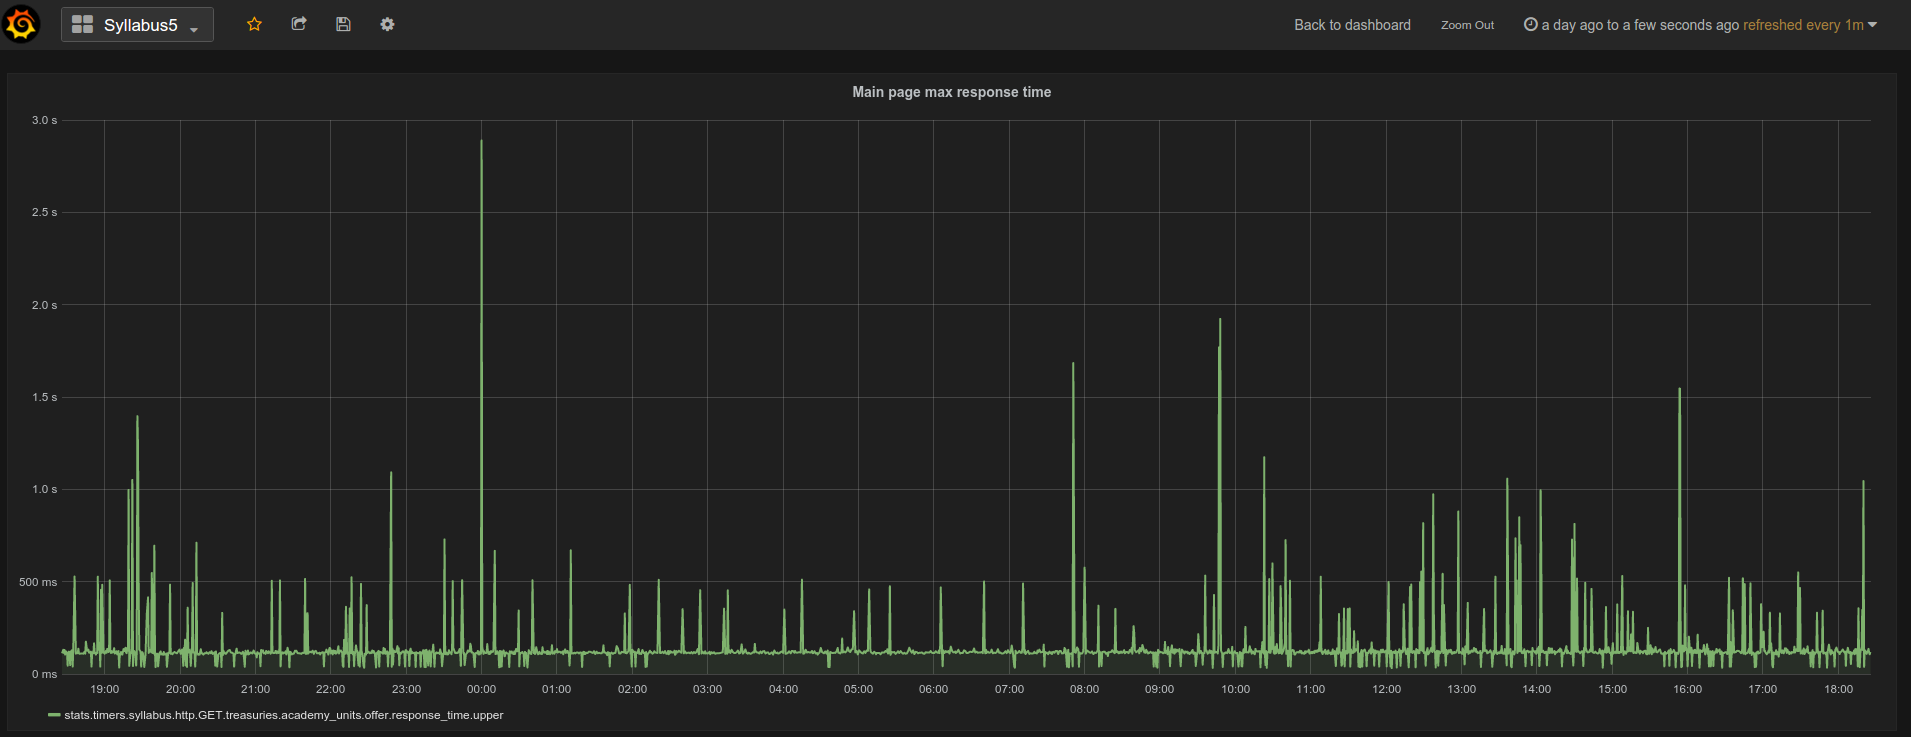
The aim of such measurements is to find anomalies that prevent the business from normal work. It is important to understand, what to measure and why. Start with critical components of your app, consider which parts might be the most important for the end user. The Stats Whisper library will help you gather appropriate statistics and identify bottlenecks. As an example, consider the chart shown below:
Understand the noise
“In average” (these quotes are on purpose) the response time is about 100ms per request, however sometimes it’s even order of magnitude bigger than the average. I’ve looked around and found that these peaks occur when user performs some search action, what was the bottleneck in this case.
Regarding quoted average phrase, note how StatsD computes its statistics values, especially timing data type. Be careful with these params, because they may get you inaccurate results. I mean they’re completely solid, but consider what mean or max offer and how these may change your point of view.
See interactions at peak performance
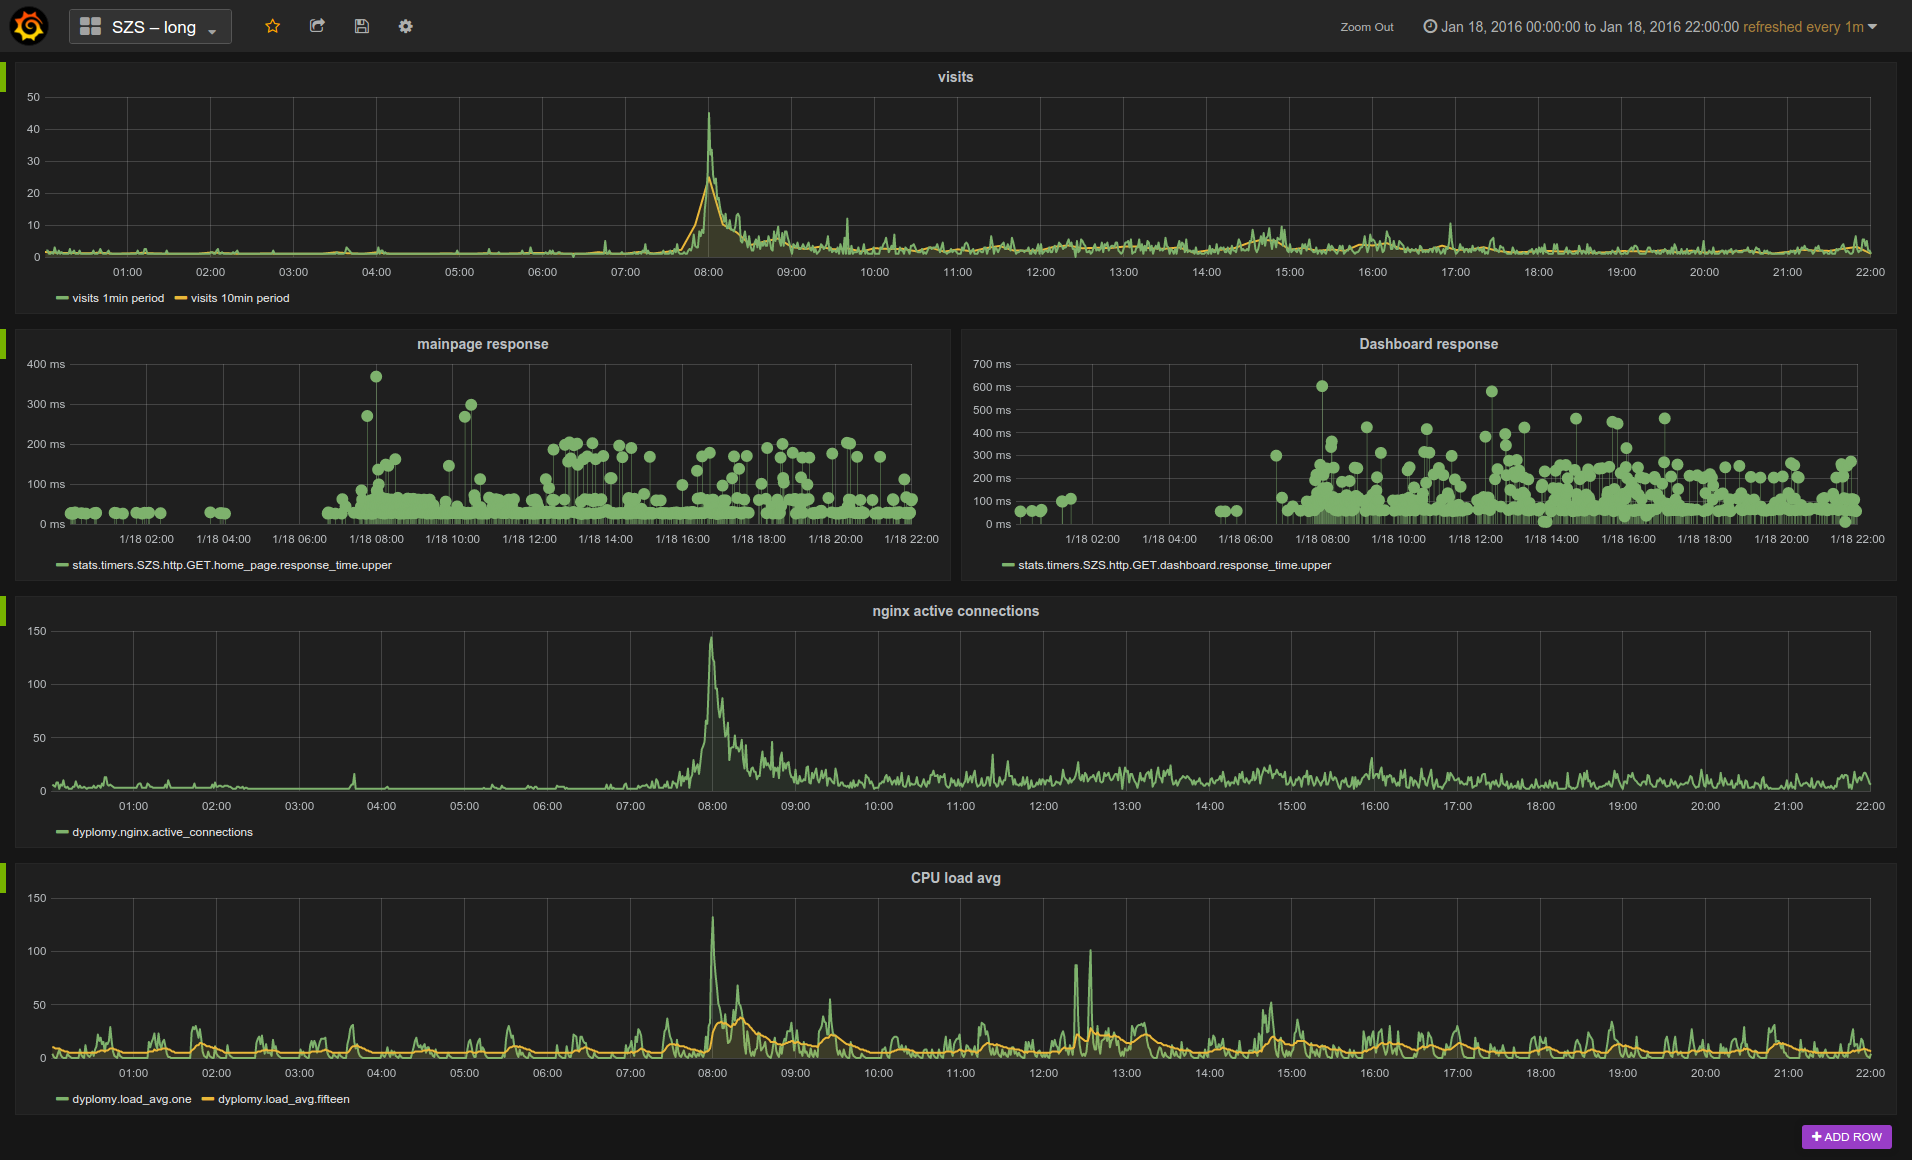
Another useful part of app statistics data analysis is the ability to unveil peak performance periods and how they interact e.g. with crucial components of the system while such events occur. See the chart shown below:
This is the real data gathered during students enrollments for elective courses. The enrollments started at 8 a.m. where the highest peak can be observed. Each student request response time has been measured and sent to StatsD counter and timer objects. The results are shown on first and second row. It’s worth noting that despite the peak performance, the upper (max value) of StatsD timer didn’t grew vast for main page and dashboard. I’ve also attached the CPU load avg to this chart to show it’s quite useless measurement, because note that it almost completely does not reflect the peak traffic – it does not tell you nothing about what is hapenning.
A few months ago I’ve written first post in this series and it seems it’s time to continue the discussion, because things didn’t stop. Not at all.
The investment in configuration, or to be more specific, in automating things isn’t free. It depends on many factors, obviously, and here it was a compromise between what needs to be done and what could be done. In our case automation, configuration management (CM) or whatever in between was the second one. The world wouldn’t end while not having CM solutions on board. Especially here, where we don’t manage a farm of VM’s in a cloud environment and to be honest, where any action could be done manually.
Even though you manage even one simple VM, I’d automate this
During last months we’ve done a lot in case of automation. We’ve also learned a lot, I mean not only the new tools, but the two–words I’d call ‘good practices’ in case of the overall environment management. We manage about 10 VM’s so it’s not much and these are in private University cluster. We’re not clouded with all of its pros and cons, but we try (or apply eventually) some cloud–solutions, e.g. we really value the cattle vs. kittens paradigm (covered in first blog post of this series).
Although we don’t manage big clusters or clouds, we managed some good practices that apply in any environment. We believe that:
Any taken action closer to automation makes your environments less error–prone. It’s insanely important in any environment, whether you have a huge cluster or a single VM, because tools works fine until someone touches it, right? If so, don’t let anyone touch anything directly, automate it.
Any part of automated configuration is recreatable, repeatable, and so it’s testable! You can test whatever you want in a way however you want to before putting it into production environment.
Any part of automated configuration can be reused and applied within any other environment. These are so–called roles and you can re–use them for any environment you’d like to provision.
Automation standarizes your environment, either a huge cluster or a single VM. It encourages you or any other person in the team to do things in a specific way, so any other person after any period of time can handle this. Whether edit some config of important tool or just add another package to the system, it all lies in one place.
Automating things isn’t free
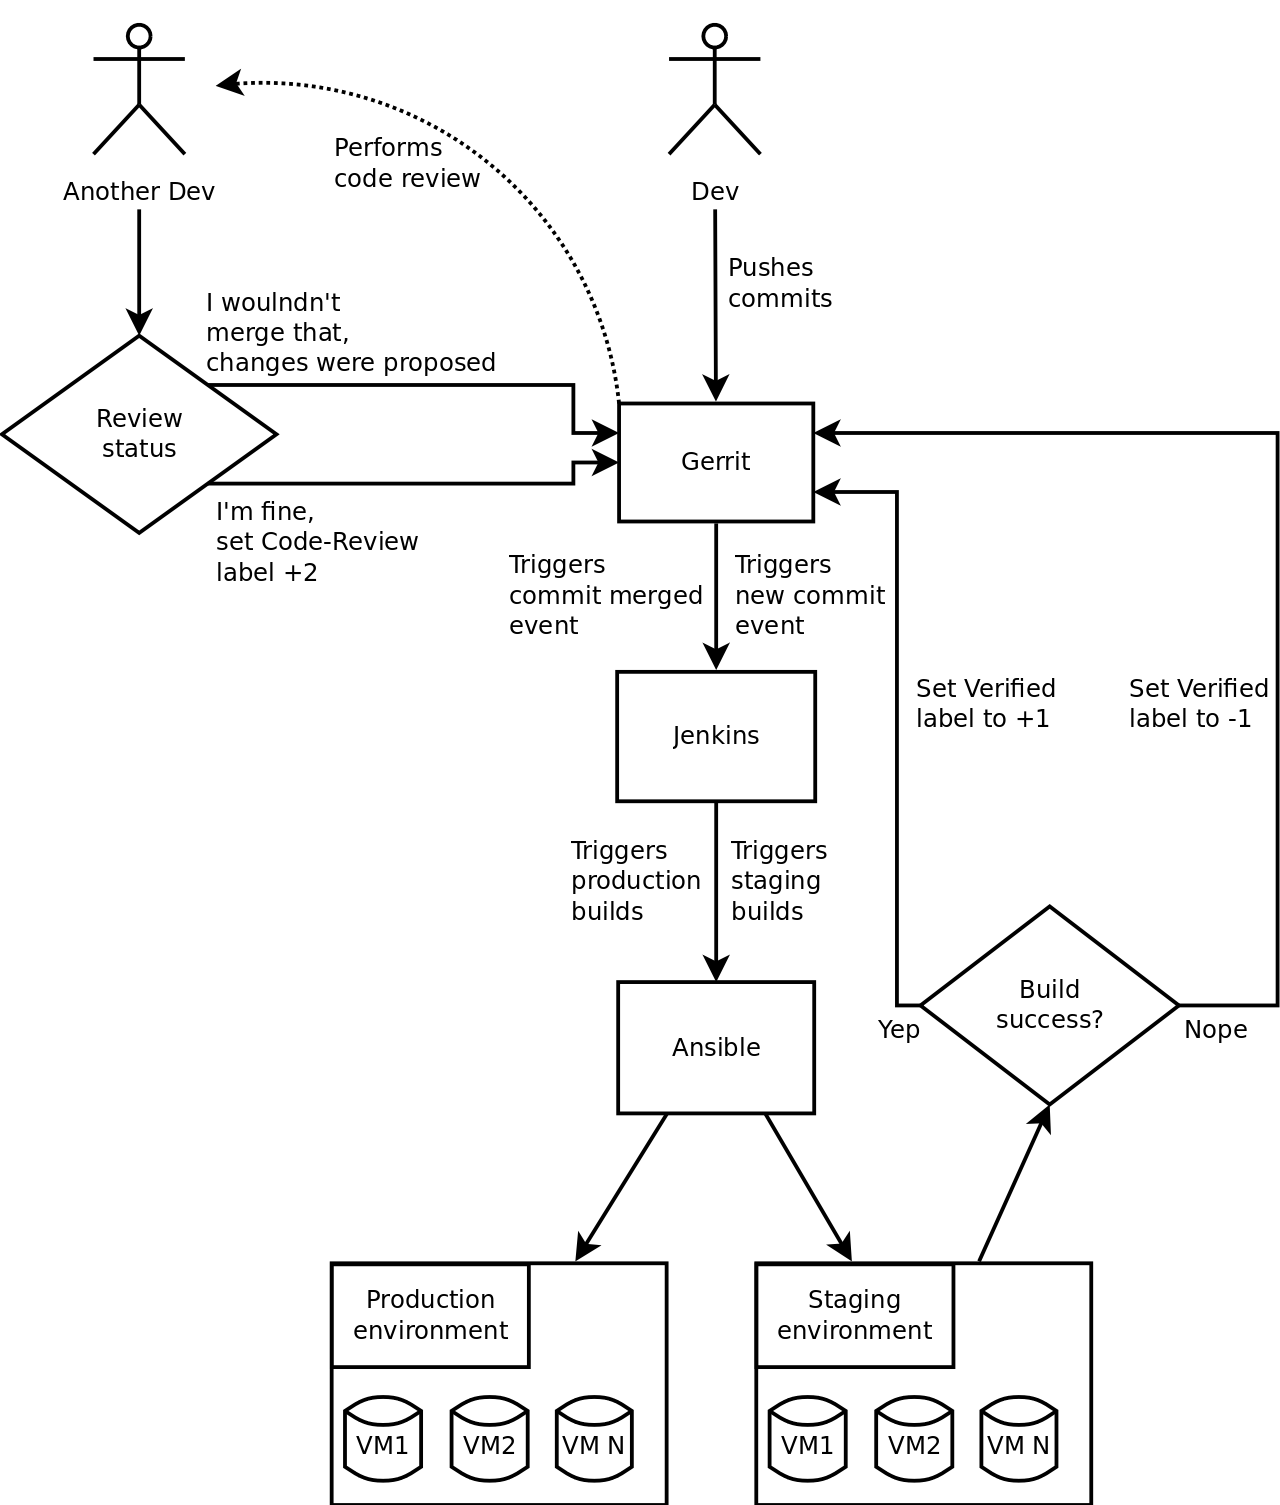
Daily work still needs to be done, because automation isn’t a top priority. Having said that, most of the CM–related work we’ve made during spare time. Week after week another components joined to the “automated WALL·E family”. We’ve used Ansible as the CM–tool and I believe personally it was a good choice, because it simply let us do the job. We’ve also introduced a few tools to achieve simple CI and so we added Jenkins, which integrates with our Gerrit to perform code review so each Ansible change has been tested upon staging environment before merge into master branch. Furthermore, for any master branch merge, Gerrit triggered an event and so Jenkins would run production build. The complete process is shown below:
However, running automated things, is so don’t keep dinosaurs
Once you’ve built automated configuration, your environments are no more pets or dinosaurs. They’re easily recreatable and configurable at scale if needed. However, the ‘scale’ word is not necessary here at all. Even having just a single VM, e.g. company developer tools VM, would be a good practice to clean it up and automate, because such VM’s become dinosaurs fast. Once the toolset has been installed, it’s better to not touch it at all, because who would ever remember why they’re exist in a such way.
To give certain examples, we’ve entered automated configuration world and gather profits from:
Standarization, where these old dinosaur–like VM’s again became manageable.
Changes testability, where each change can be tested before putting into prodution environment.
Recreatable environments, so we can forget about VM major system upgrade and instead create exactly the same VM, but with newer environment version – this is so–called zero downtime migration.
Monitoring things. It’s a shame to say that, but we weren’t monitor our services until that time. It’s quite interesting what metrics could tell you about particular service or the whole system. I mean, among other things, counting or measuring requests response time for certain views (actually it’s a topic for another blog post).
…each other, because all these configs, packages and other manageable things lie in one place and so anyone can enter the repository and see how exactly that thing has been performed or installed. It’s all way more transparent.
Don’t feel ashamed and start automating things today.
The problem: execution time of Ansible playbook takes too long
The context
Having a set of VM’s and several roles to execute, I’ve started to think how to shorten the execution time within the cluster.
First solution – extract and execute only the code that’s been changed
As we use here a CI for Ansible, the first idea was to execute only the role that’s been changed. It sounds quite reasonable, because only concrete piece of playbook lifecycle is executed, without touching all the rest, unchanged. However, it works smootly until it concerns internal roles.
Let me explain the current solution for staging environment. What’s executed after a change is being pushed into repository, is distinguished with a piece of Bash script:
tags=`git show --pretty="format:"--name-only$GIT_COMMIT | grep-v'roles/requirements.yml' | grep-e'roles\/' | awk-F"/"'{print $2}' | paste-sd"," -`if![-z"$tags"];then
echo"Running for tags: $tags"
ansible-playbook --tags="$tags"-i staging_inv site.yml
else# Execute all stuff
ansible-playbook -i staging_inv site.yml
fi
In particular, it extracts what’s been changed from a Git tree and enforces to run build for concrete tags. These tags match role names, e.g. if any file of role common has been changed, build executes only for role common. Unfortunately, it shines until you add an external role. Given that, lets say the main directory playbook structure looks like:
When you add an external role, what you do – in most cases – is extending *vars with some configuration variables related to the role and that’s all. It provides great flexibility for including additional roles, however it also reduces the possibility of extraction only certain roles to execute (based on the piece of code showed above). For such nginx external role example, you’d only need to add some variables related to the role so the above extraction script wouldn’t match any code from within roles directory and hence, peform all tasks defined within a playbook.
Second solution – build a wrapper role
Any Ansible role may depend on any other role, where dependent roles are executed first. Role dependencies are given within host role meta/main.yml:
---dependencies:-ansible-role-nginx
The host role (one that’s having dependencies) would provide all essential variables for the dependent roles and it plays nicely. Basically, the nginx wrapper role looks like:
$ tree ./roles/nginx/ -L 1
├── defaults
├── meta
├── tasks
└── vars
where vars provide common variables for ansible-role-nginx role. The common word is on purpose, because what if you’d like to deliver configuration for several nginx instances, where each instance differs slightly (e.g. is having different SSL cert)? The whole wrapper role plan crashes, because it needs to be distinguished somehow what plays where, so the solution would likely to use either group or host_ vars, whereas the extraction script doesn’t know anything about these directories (because they reside within playbook main dir).
However, there’s a light for such approach, I mean using wrapper roles:
nginx role–case is quite unusual. In most cases it will be sufficient to use wrapper role vars and define essential variables there.
External role common code has his own isolated environment with the ability to test it, using the above Bash script.
Wrapper role may include additional tasks and these are applied right after all dependent roles are applied. However, to apply pre–role tasks, different approach is needed.
The problem – applying pre–role tasks for certain role
The context
The current design of applying pre or post tasks of certain roles is limited to concrete pre/post tasks defined within a playbook. Such approach, however, implies that playbook becomes both, the declaration and definition of roles and tasks, which sounds like a straight way of having a speghetti code.
Everything should be roleized
Because it keeps your code clean and readable, no matter whether it’s a bunch of tasks or just one that creates a directory. Be consistent in what you do and that will cause profits. Instead of adding pre_tasks to your playbook, create another role, e.g. pre-nginx that simply creates cache directory or whatever is needed before role is executed.
The problem – complex role configuration and staying DRY
The context
Lets say you have nginx role on board and it manages many Nginx instances. Some of them need various SSL certs or are working with different application servers. How to manage that and stay DRY?
Cheat with Jinja2 features
Ansible uses YAML language for tasks definition and despite its simplicity, it has some limitations (e.g. config inheritance). Here comes Jinja2 template language that would help in such cases. Let me explain it on an example, e.g. with this nginx role. The role is used upon the wrapper role pattern described above and contains:
Then, for a concrete host or group vars of your inventory, specify final configuration. Lets say you have foo app and you’d like to provide config for bar host that reside within your inventory file. Given that:
The nginx role doesn’t install SSL certs itself so it’s up to you how and where you’d like to put them. However, it might be simply achieved with these tasks, applied before nginx role:
Note the difference between > and | in YAML. The former is the folded style and means that any newline in YAML will be replaced with space character, whereas the latter preserves newline character.
Jinja2 templates in conjunction of YAML features, provide great flexibility in config definition. However, as of Ansible 2.0, it’s likely that it will change slightly, because it will be possible to use Jinja2 combine feature for merging hashes.
We provision our environments with Ansible and we want these to be super–reliable. However, having sometimes several daily deployments, how to ensure that any change will not ruin the production environment? Some whisper to move to the containers world and get rid of the traditional way of provisioning/maintaining environments. Here, in the middle of major Ops changes, we use private cluster working on bare metal and so, we have slightly different requirements than the cloud world. We don’t use containers everywhere and we don’t have a plan to do so, at least within apps related context. As we provision with Ansible we want to be sure that any change will not cause any environment outage.
Testing any CM tool is not a trivial task, because they essentially need an isolated environment to fire tests. It’s not just a matter of amount of RAM or CPU cycles, but primarily of having the dedicated environment the services need to operate. Moreover, as we use private cluster whereas we don’t manage it, we have just a bunch of VM’s we can use in whatever manner is needed, but still without any easy way to drop or spin up new VM.
Testing Ansible changes
The Ansible tool marvelously implements roles–profiles pattern, which give us the ability to test any particular service in isolation – let’s call it as a service unit test. In Ansible terms, any service is simply a role that delivers some set of commands to ensure that service is up and running. Here, we can distinguish certain test levels criteria:
Service is up and running on localhost.
Service talks to authorized clients.
Service delivers appropriate content.
Testing the first level is often met by the role itself and since you’d use something out of the box, you’ve it included. Ansible has a bunch of predefined modules and another tons within Ansible Galaxy maintained by the vast community. Actually it’s very likely any tool you’d imagine to use has already well–prepared role ready for deployment.
The next levels of tests are completely up to you, but you’d probably find, that it’s getting complicated fast, even for a small change, e.g. adding another web–VM instance within hba.conf file to get access to PostgreSQL database. So we started to consider of having a CI for infrastructure provisioner, where:
The cost of environment preparation is relatively small.
Time of execution is as minimized as possible.
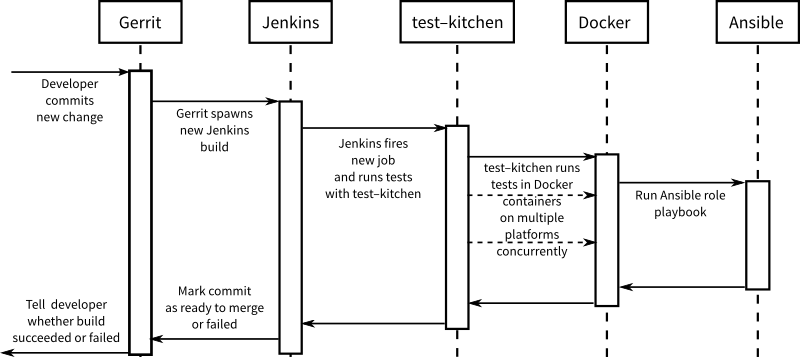
Having these assumptions defined, consider the schema below:
In short, when developer commits new change to Gerrit, Jenkins triggers new job for test–kitchen gem, which internally spawns Docker container(s) to perform change tests. Gem test–kitchen is able to establish more containers at once and run tests concurrently. To distinguish what roles have changed per commit:
I’ve built an example of how to use test–kitchen with predefined Docker image where tests run in a matter of seconds. It really works great, but in context of role, not the whole system. The awesomeness disappear when you realize it’s not what you wanted to achieve, because in case of Ops – in my opinion – it’s more important to focus on integration tests to provide more customer oriented environment, e.g. at least to test if given service is running or responding instead of focusing if directory exists or config has changed.
Indeed, if tests run per each role, it’s easy to spin up test environments and run tests fast thanks to containers. Such tests, however, have the drawback that they don’t give the value you’d expect – each role provides some service, but testing such single service without interaction with other services is quite meaningless. Nginx won’t serve appropriate content without interaction with some webserver and so, webserver won’t serve appropriate content without some database and so on.
On the other hand, blending all Docker–Jenkins–whatever tools to build CI just for testing for Nginx availability on port 80 is like using a sledgehammer to crack a nut. So we decided to discontinue such process, because of the overhead of preparation test environments to gain valuable results.
The good the bad and the ugly
Nonetheless, the idea of role–oriented tests is definitely worth looking at. With some investment in scripting and perhaps Docker Compose on board, it would spin the environment with services talking to each other, but it’s still an overhead to deal with. Besides, there’re also Docker containers limitations regarding changes in container networking or firewall (need extra --privileged mode) and so they also should be discussed before entering containers.
As for our CI environment, so far we’ve ended up with testing Ansible changes using flags --syntax-check --check on appropriate playbook from within Jenkins job and doing peer review.
So you are a team of 3–5 and run a small company. You are happy with that and so we are. As we are commited to our deliverables, we need to do our job smoothly. We need appropriate tools for the right time to let the business run (and to make money, right?). Altough our teams are small and resources are limited, we still can improve our velocity. It’s actually inevitable if you want to stay on the market. Each such investment implies a non-zero cost, because of the learning curve etc. Thus it’s essential to invest in something valuable, that would keep us on the front – improve our throughput.
This set of posts aims to be somewhat a guideline of how to improve deliverables, by applying DevOps culture in a small company, or in particular – the automation.
Overview of current state
Did you hear about the Joel test? It’s quite old from the IT point of view, but still valid. As a matter of fact, it’s not an issue if you didn’t, because it’s somewhat a quality measurement, however very valuable, because it gives an overview of the current company state. So, how much points are you compliant with? Those twelve questions are the validator to help your business win so go and find them useful. Likewise, there are various aspects related to those questions and I’m going to touch some of them. In this case I mean managing the configuration.
Where configuration meets automation
Well, automation of provisioning the environment is not a new topic, because people are doing it for years or perhaps even decades. Bash, Perl or Python were predecessors, but in the last few years the topic evolved vast. Actually, you’re already at the gates of the Kingdom of Happiness even if you’re doing it with simple Bash script, e.g. to install Nginx, configure firewall or whatever is needed to deliver your app. It is, because you have some configuration process that let’s you provision the environment (or part of it) with reliability in any point of time.
As the above process remains valid, today we have some nicer toys to play with configuration, e.g. Chef, Puppet, Ansible, Salt or even Packer (it slightly differs from the others). These will help your company, because they push orchestration on completely new level of abstraction. OK, You’d say:
– but I need only few tools to run my app – why should I care?
– read below.
The Kittens world
Kittens are pets. Each cute little kitten has a name, get stroked every day, have special food and needs including “cuddles”. Without constant attention your kittens will die. Common types of “kittens” are MSSQL databases, Sharepoint, Legacy apps and all Unix systems. Kitten class computing is expensive, stressful and time consuming.
Unfortunately, often these Kittens are our production environments, which in case of any failure, results in a huge blow–up. To give an example, imagine you’re doing release upgrade on your Ubuntu LTS or just PostgreSQL version upgrade. Sure, you can put your app into maintenance mode and throw away all the users for a half day, but that’s not the case these days. Some call this approach the Phoenix Server Pattern and some the Immutable Deployments. The point is to deliver profits with immutability. Instead of doing Ubuntu release upgrade, throw it away and provision new VM with latest release.
Human failure
It’s in our nature to make mistakes, however we can minimize them. Any process that brings some automation, also minimizes failure probability. Despite it’s an investment, it’s profitable.
In the Rubyist world, there’s a tool called Bundler to manage dependencies. Bundler ensures that dependencies are consistent according to app needs. OSS world changes often and not always fluently to migrate from version X to Y. You need to manage these dependencies, e.g. to ensure version 1.2.3 of some dependency and 2.1.1 of some other. Bundler gives you extremely powerful engine to manage them and so CM tools give you the power to manage your environments. You always get the desired state.
Build your environment
CM tools are somewhat like build tools, e.g. Maven or Gradle, but instead of getting the result as file or set of files, you get freshly baked environment. Baked according to the rules from Cookbooks (Chef), Manifests (Puppet) or Playbooks (Ansible).
Any of these tools also offer extra level of abstraction to ensure maximum flexibility, but yet, organized in some manner. Having a set of VM’s, you can tell them to first configure some common context, e.g. a firewall or SSH, then a web–server, database, proxy or whatever is needed. For any given set of VM’s, you get the desired state, with open ports 22 and 5432, but closed everything else. Then for any subset of these VM’s, installed web–server or database. Any defined rule is applied where it’s desired – for a node (VM), set of nodes or even set of subset of nodes. It’s all up to you how you manage it. There’re some common patterns, e.g define roles (nodes), which include profiles (a set of rules to configure given tool, e.g. nginx). For Puppet it’s roles–profiles, whereas with Ansible it’s somewhat enforced by default.
It’s also worth noting that whatever rule you apply with desired CM tool, the applied rule is idempotent. It means that it will not apply firewall rules twice or more and mess with your setup, no matter how many times you’d apply that rule.
Keep calm and scale
To some extent, it’s just fine to scale vertically, however the cons are that it requires extra machine reboot and sometimes might be just a waste of resources utilization. On the other hand, to scale horizontally, it’s essential to have new environment(s) prepared to the desired state. Sure, you’d use the golden image approach and scale just fine, but well, these days have passed. Just imagine a new library installation with golden image approach and you’re off of this idea. CM tools give us much more flexibility to handle such cases.
Where shall I start?
Before you’ll start with anything, these below are your key points:
In other words, gather requirements first. See how the business works and understand it, deeply. Now, blame me, but for me validation is just fine even if you do peer review as the underlying aim is not to overload ourselves. Then, finally, start playing with your desired tool. If you don’t have any, yet, go and find whatever would be useful for you. I’ve used Puppet for some time, but switched to Ansible then, because of simplicity. Puppet has his own Ruby–based DSL to write manifests and is built upon master–agent pattern in its basis. However, it implies that each node needs Puppet–agent installed and set up SSL certs so that master and agents can talk to each other. For better node management, Puppet has some third party tools to better utilize his capabilities, e.g. Hiera to manage global environment config (e.g. to apply Ruby version 2.1 on a subset of nodes), or R10K to deal with any sort of environments (e.g. dev or production). There’s one more caveat to Puppet, quite common actually – because of Puppet design, if there isn’t explicit rules (resources) hierarchy, Puppet would apply them in a random order, which may cause unexpected results. In order to prevent it, Puppet DSL implements dedicated ordering by setting relationships between resources.
Ansible Playbooks on the other hand are YAML–based and top–bottom applied rules. It means first rule in Playbook is applied first, then second, then third etc. Besides, Ansible doesn’t implement master–agent architecture. Everything you need to run it on nodes is Python installed with python-simplejson library. I claim Ansible has also shorter learning curve according to Puppet, more modules supported by the Core team or just better docs. I’ve prepared simple Puppet vs. Ansible comparison (it needs Vagrant and VirtualBox) that simply configures SSH and firewall so you can play with both.
Kill your Kitten and see what happen
The idea behind this post was to unveil that CM matters. Even if you’re tiny player on the market and spinning new apache installation twice a year or doing whatever library upgrade ever less once in a while, it might be a valuable investment. Just after a few years, maintaining such Kitten becomes a pain, because no one ever remember what was there and what for. Keep your environments lean and auto–configurable and you’ll notice the profit.